Printing

Experimenting


Stenciling on natural dyed (tea and coffee) fabric.


I'm using purple and yellow acrylic paints and a stencil brush.


This while waiting for the screen printing supplies to arrive.  The bulb in my thermofax machine died and is no longer available, so on the advice of some trusted artist friends I've purchased Jacquards drawing fluid and filler to make silk screen designs.  The upside to this is I'll have large screens for screen printing natural dyes onto the cloth.

Deconstructed Screen Printing with Natural Dyes and Stencils!

Materials List: 
Silk Screens
Squeegee for Silk Screen
Stencils
Natural Dye Extracts
Gum Tragacanth Binder
Containers to hold natural dye extracts/binder I used paper cups.
Plastic Spoons
Newspaper
Masking Tape
Fabric or Watercolor Papers

Products Used:

Links:
How-to make the Gum Tragacanth Binder Video

I am here today to show you how to use stencils with a silk screen and natural dyes for screen printing.


Instructions:
Mix up Gum Tragacanth with Natural Dye Extracts; see video for specific amounts and mixing instructions.  I made a little card with the names of the extracts I was working with and daubed a bit of the color next to each name, for future projects.

The Natural Dye Extracts blended with the Gum Tragacanth are now ready for printing!

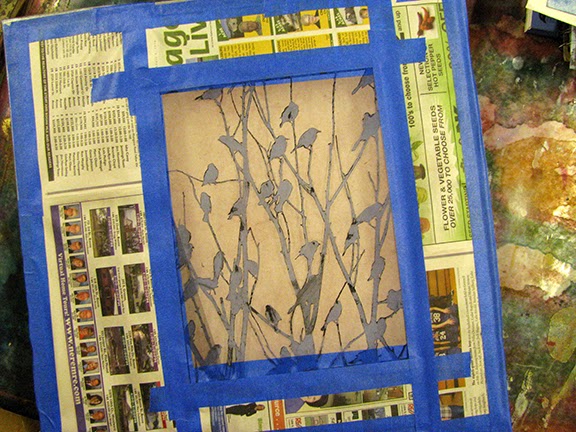
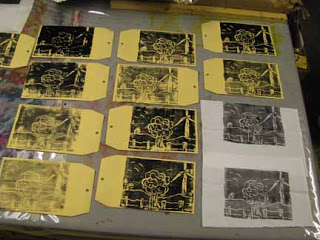
Most silk screens won’t be the same size as your stencil, however, I have an easy fix for this problem.   Measure your screen and your stencil and then block off the required space for your stencil by taping news print to the FRONT of your silk screen.  Then tape your stencil to the front of the screen making sure to overlap the stencil onto the newsprint.


Blocked off silk screen, as seen from the front.


Blocked off silk screen as seen from the back.


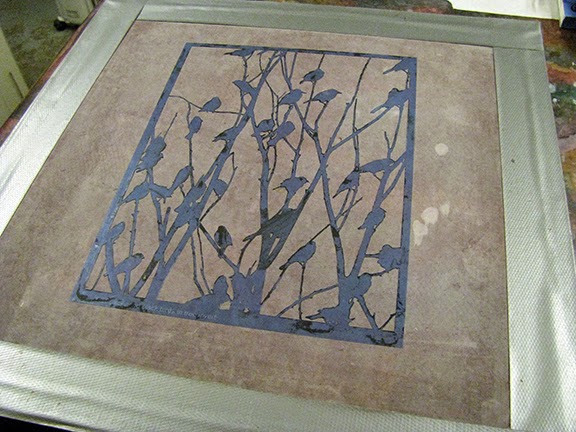
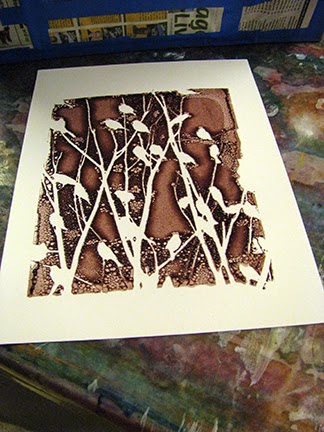
Black Birds in Tree Inverse taped to the FRONT of the silk screen.


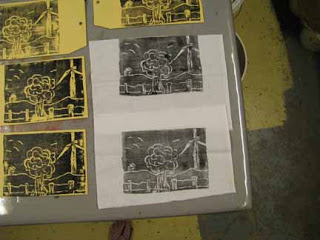
Place your natural dye binder medium onto the screen, towards the edge, this is known as “the well”.  Using your squeegee pull the medium in a firm manner across the screen, once you have reached the other side, pull the medium back towards yourself, do this several times adding more of the natural dye binder medium if needed until the color on the screen looks even.


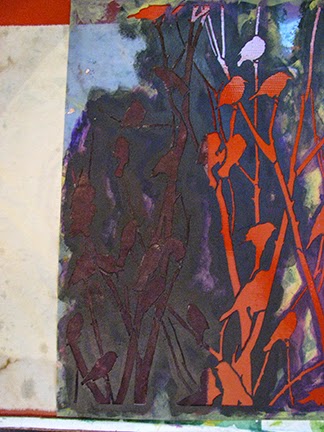
Gently lift up the silk screen from your substrate, I used 300# cold press watercolor paper for this sample.


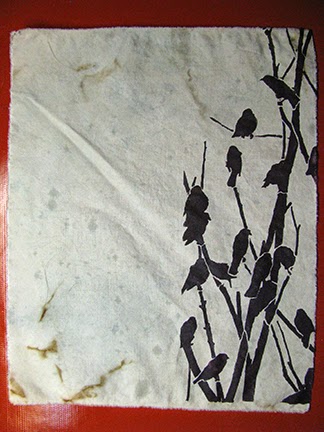
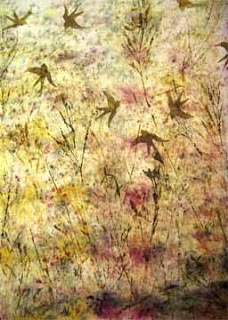
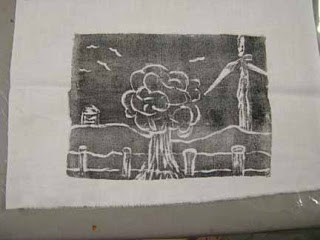
For this sample I used the same stencil and screen to print the image onto cochineal dyed cotton fabric that I had surfaced using my hand and earth pigments and fabric paint.


Printing onto cochineal dyed cotton fabric.


If you wish for your fabric images to be free of bumps, etc., tape the fabric to your surface to keep it from moving, etc., while printing.  I prefer an organic and whimsical look and therefore don’t tape my fabric to my table.

Marigolds and More!!!


 My first ever newsletter went out this afternoon!  I will be sending one out once a week from here on out, now that I've spent some time learning how to use MailChimp.

Here are a few of the things discussed in my newsletter in case you missed it!

 
I am inviting you to join me at the Natural Surface Academy in 2014 to participate not only in the Marigold Project BUT to also unleash that creative prowess you know is lurking deep inside of you!
 
  • 2014 will start off with a Splash as we work on our 30-Day Cold Dyeing Project, I will be using both marigolds AND madder root with Wool, Silk, and Cotton Fibers.
  •  
  • We will go to extremes with our natural dyed fabrics, fibers, yarns, and more in my Extreme Embroidery class! 
  •  
  • Get down and get gellied when we print fabric and paper with natural dyes using a Gelatine Plate for printing!
  •  
  • And this is only the beginning! 

Gum Tragacanth Binder for Screen Printing.

To make print paste
2 - 4 Tablespoons of Gum Tragacanth depending on the consistency you desire. For painting I use 2 T. for printing I use 4 T 1000 ml of boiling water

Container to boil water in, and heat source for boilingwater
Blender
Squeegee or rubber spatula – the kind used for scraping bowls
Container with screw on lid – 1 quart variety
Respirator for handling the Gum Tragacanth in powdered form
Measuring cups and measuring spoons


Bring 1000 ml of water to a boil add to blender – after

I let it cool a bit so as to not wreck my blender.

Add 2 – 4 Tablespoons of Gum Tragacanth powder to the blender, put lid on blender and blend until a creamy consistency.

Remove from blender using a spatula or squeegee

place into your container with lid. I use wide mouth jars as this makes removing the paste much easier.

Cool the paste to room temperature, cover with tight fitting lid.

Store in refrigerator for up to ten days, I have found that it’ll last longer if you avoid introducing contaminants
to the paste.

Thermofax Woes


The light bulb burned out on my thermofax machine this afternoon, I've been doing some reading since then nad have discovered that my machine is 1. much older and 2. the light bulb for this machine is not that common!  If you have a thermofax machine you need to check the amps/volts before you purchase your bulb the bulb for the 12 amp 115 volt machine will NOT work in my machine!  Onward searching I go!

Mono printing

I over printed yesterday's reverse print, which didn't turn out so well the print looks really good with color coming from behind, though if I were to do it again I'd make the top print more saturated.

This last one is my favorite out of the bunck, even if it is a little crooked on the paper. The object in the background to the right is a windmill, they are springing up all over the rural landscape here so it's only natural I would incorporate them in my work. ;-)