I'm in the process or updating my rust dyeing information - the part about neutralizing. Substitute out Baking Soda for the salt!!! I thought I had done this about six years ago, but apparently forgot to do so. So use 1-2 tablespoons of Baking Soda per gallon of water and upwards of a quarter cup of baking soda to 4 gallons of water.
Direct Discharge Rust Update
I'll try to post pics later this evening but wanted to post an update. The direct method is finished and has been washed, rinsed, and dried NOTE very little color left the area BUT the fabric is much softer which would make it easier to needle or sew with the machine. There are gobs of holes as well on this particular piece, whereas before I applied the baking soda paste there were only hard crusty areas.
The plan is to stabilize the fabric, just like the previous piece, and stitch as usual with my machine. I will embellish the areas around the holes and take it from there.
Have a wonderful New Year Everyone!
The plan is to stabilize the fabric, just like the previous piece, and stitch as usual with my machine. I will embellish the areas around the holes and take it from there.
Have a wonderful New Year Everyone!
Removing Excess Rust - Direct Method

Removing Excess Rust - Direct Method
Supplies Needed: Baking Soda, Old Tooth Brush, Spoon for mixing water and baking soda, sponge brush, optional, warm water, plate or bowl for holding baking soda paste.

Place onto your plate or bowl about 1/4 cup of baking soda, mixe warm water into the baking soda but just barely enough so that you have a thick paste, not too runny.
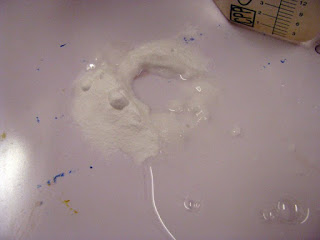
You don't want the past to be too runny as you want it to sit on top of the rusted areas and penetrate the rust, allowing it to sit on the surface will help to break down the thicker rust areas on the surface.

Apply the baking soda paste with a sponge brush or an old tooth brush.

Notice how thick the paste is on the surface, it is sitting on the surface.

Take your brush and work it into the surface of the fabric.
THEN flip your fabric over and repeat.

Apply a second layer of baking soda paste on the back side of the fabric, this is especially important on very thick areas of rust. Yes you will lose color on your fabric however that can be gained back later in an iron mordant bath if desired.

Now that you have the baking soda paste worked into the surface wet the surface slightly to ensure further removal of the rust, you don't want the fabric to be dripping wet, just slightly damp. If need be you can repeat this process as many times as necessary until you have acquired the desired level of rust necessary for sewing.
Wash, rinse,and dry fabric in the normal manner after removing excess rust, you may need to do this process more than once.
Removing Excess Rust - Getting Started
Removing Excess Rust - Getting Started Removing Rust is very simple and is a form of discharge dyeing.

Above supplies needed, excluding old tooth brush, foam brush, and nitrile gloves, includes bucket for soaking fabrics in, baking soda, water, and rusted fabrics.
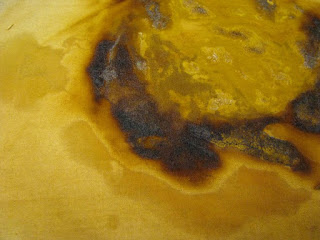
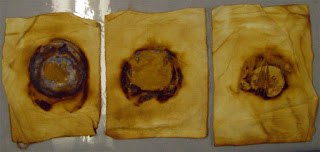
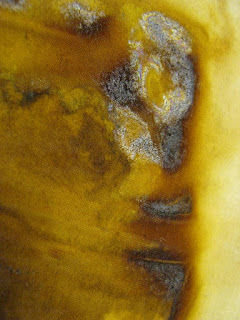
Above are three pieces of fabric I rust dyed using an old coffee can lid in 2003, each piece of fabric has varying stages of rust on the surface depending on their position in the rust bundle layer. The piece of fabric to the far left was closest to the metal lid and therefore has acquired the greatest amount of rust on the surface. The iron oxide particles are so thick that they shimmer as just like metal.
Above, detail of teh rusted fabric and rust particles. Click on image for greater detail
Above supplies needed, excluding old tooth brush, foam brush, and nitrile gloves, includes bucket for soaking fabrics in, baking soda, water, and rusted fabrics.
How to remove heavy areas of rust from my rusted fabric?
Question of the Day: How to remove heavy areas of rust from my rusted fabric?
You neutralize the rusted fabric with baking soda water first and then if there are chunks left behind, ok I leave mine because I like the look, you can put a baking soda paste on the fabric to help break it down. Keep in mind that sometime...s the rust chunks simply do not go away but it's worth a try.
Rubbing in with a toothbrush also helps, I have done this but gotta admit I have one piece of fabric that was super chunky and decided to work with it instead of trying to get rid of the rusted areas.
Indigo Dyeing Safety Instructions
Indigo Vat Safety Instructions
DO NOT TOUCH YOUR FACE OR EYES WHEN HANDLING LYE, SODA ASH, THIOX, OR ANY CHEMICAL!!!
Lye Handling Instructions
NEVER add water to Lye (Sodium hydroxide). You will create a dangerous reaction doing so. ALWAYS add your Lye (Sodium hydroxide) to “cold” water.
Once the Lye is added to the “cold” water the water will become very hot from the chemical reaction! This reaction will cause your utensils and vat container to become hot. Have hot pads or insulated gloves for handling hot equipment.
Make sure that your container can withstand high temperatures.
Read safety instructions that came with your Lye (Sodium hydroxide).
Lye (Sodium Hydroxide) is dangerous! Extreme caution must be used when handling lye (Sodium hydroxide). Lye (Sodium hydroxide) will cause serious burns to the skin, eyes and mucous membranes.
A respirator is required when handling lye(Sodium hydroxide) products as inhalation of the fumes can cause serious burns to the nose and mouth (mucous membranes)
Wear protective gloves, such as latex or nitrile gloves, when handling lye (Sodium hydroxide). Lye (Sodium hydroxide) can cause serious burns to the skin, especially if your skin is moist! The lye (Sodium hydroxide) will start reacting with the moisture on your skin immediately, causing serious burns.
NOTE: Make sure that your gloves are proper fitting, and not too lose, as an ill fitted glove can lead to accidents.
Wear safety goggles/glasses when handling lye (Sodium hydroxide)! This is to prevent any of the lye liquid/fumes from entering the eyes.
NOTE: Do not touch your face, eyes, or ears when handling lye (Sodium hydroxide) products!
Wash your hands thoroughly for five minutes, and upper arms, after working with lye (Sodium hydroxide). You want to make sure that your hands are completely free of chemical before touching any other parts of your body to prevent burns.
Do NOT use with aluminum or cheap stainless steel containers or utensils. Do NOT put lye into an a cast iron pot!
FIRST AID: wash burned area with cool water for 15-20 minutes. Call or seek emergency help for burns. Seek medical attention immediately.
If swallowed seek medical attention immediately. Do NOT induce vomiting!!!
Keep Lye (Sodium hydroxide) away from children and small pets.
IF a spill should occur sweep of lye and dispose of down the sink drain with copious amounts of cold water.
This ALSO applies to Thiox, Indigo extract, Soda Ash or any mordant, assist, or chemical when you are working in the studio.
Thiox will burn your skin wash immediately with water.
Work in a well ventilated area, I prefer to work out of doors with the wind blowing away from me.
Wear a respirator when working with Natural Dye Extracts, Mordants, and Dye Assists
DO NOT PUT WATER INTO YOUR THIOX POWDER AS THIS CAN BE DANGEROUS CREATING A TOXIC CLOUD OF GAS!!!
Rather using a studio dedicated teaspoon place your thiox into the indigo vat.
Indigo Dyeing using a Lye or Soda Ash vat
Dye Materials Needed
1 ounce Indigo extract or Indigo chunks
1 cup Soda Ash or Lye (I HIGLY recommend using Soda Ash NOT Lye~!)
2 Tablespoons Thiourea dioxide or Thiox
Water
Equipment needed:
Respirator – you only get one set of lungs! Wear a respirator when handling dye powders, mordants, and dye assists~!
Gloves – wear heavy duty kitchen or dyeing gloves when handling the indigo ingredients (See safety Instructions Below)
Stock Pot 18 quarts or bigger, can be Stainless Steel or Enamel the indigo vat will react with aluminum so I don’t recommend using aluminum pots for creating the vat.
Scale for weighing dyes and chemicals – again studio dedicated!
Measuring spoons, measuring cups, wisk for stirring
Jar – wide mouth pint jar for making indigo paste
Spoon, studio dedicated, for stirring the vat
Tongs for retrieving your fabrics, fibers, etc.
Lingerie bag for small items you wish to find in the vat again the bag makes them easier to retrieve
Water for your vat, rinsing, and for oxidizing
Vinegar – helps to restore the pH balance of wool and silk fibers/fabrics
pH papers/strips for testing the pH of your vat.
Heat source
Clothesline for hanging fabrics onto to help fabric oxidize faster.
Natural Indigo Chemical Reduction Mini-Vat Instructions:
1. READ Safety Instructions before Beginning the Indigo Vat!
2. Fill your vat container with water you don’t need to heat the vat at this point. ALLOW TO SIT OVERNIGHT, doing this allows the oxygen to dissipate from the vat.
3. Place 1 ounce Natural Indigo powder (if you are working with hard chunk indigo it will have to be ground down first) into a suitable container.
4. Add just enough hot water until you get a paste – preferably lump free (I use a dedicated wide mouth pint jar for this solution.
5. Add soda ash or lye to the vat water - NEVER add water to your soda ash or lye ALWAYS add the soda ash or lye to the water!!!
6. Slowly add the indigo paste to the vat solution
7. Stir to dissolve NOTE this may take quite a bit of stirring, heating the vat at this point also helps with dissolving the paste faster.
8. Next add thiox to the vat solution stir very little so as to avoid adding Oxygen to the vat.
9. DO NOT BOIL YOUR VAT as this will cause bubble formation and will introduce Oxygen into the vat.
10. REMOVE HEAT after 30 minutes
11. Cover vat and allow to sit until reduction is complete.
12. Reduction is complete when your vat turns a yellow to yellowish pea green color.
13. If your vat is still blue after 24 hours then you have too much Oxygen in your vat add thiox to the vat in small increments, a few grains of thiox at a time, to further reduce the vat.
14. If you reduce the vat too far then gently stir the vat with one or two swirls of the spoon and allow to sit for 30 minutes.
15. You will need to test the pH of the vat to see if the pH is correct
16. pH should be 10.0 – 11.5
· cottons 11.0-11.5
· wool and silk 10.5-11.0 preferably closer to 10.5
17. Adjust pH by adding small amounts, half teaspoon at a time, of soda ash to your vat, even is you created a lye vat do NOT add more lye to the vat at this point.
How to Scour Cotton Cloth
Scouring Fabric
Kimberly Baxter Packwood © 2001
When working with any mordant or dye powder always wear a respirator with fresh filters.
NOTE: Any dyeing equipment used in natural dyeing, should never ever be used or reused for the preparation, storage or cooking of food or beverages.
What Scouring Does:
Scouring fabric is easy and will ensure excellent dye uptake every time.
Scouring is a two step process, both steps must be followed if you wish to acquire the greatest depth of color.
Scouring fabric removes the grease, dust, dirt and grime that fabrics encountered during the manufacturing process and transit.
How to Scour Your Fabric:
Simply wash your fabric, this includes PFD fabric, in the washing machine in hot water with Soda Ash. Do not add any fabric softeners to the wash. If you must dry your fabric do so without any fabric softener sheets
NOTE: Fabric softeners interfere with both natural and synthetic dye uptake.
Using an large enamel or stainless steel pot, fill the pot at least half full and place one ounce of soda ash into the pot per pound of cotton or linen fabric/fiber.
Place fabric into water, swish it around using a stainless steel spoon.
Bring water to a boil!!!
Adjust heat to a low boil/hard simmer and allow to boil for two hours. stir the fabric every 15 minutes or so t make sure that the fabric is being adequately scoured
After two hours remove from heat source, allow fabric to cool down until the fabric is at room temperature.
Remove the fabric from the water and rinse.
NOTE: If the water is brown or grey replace the water & soda ash mixture with fresh water and soda ash and re-scour the fabric, it is not clean yet. repeat this process until the fabric rinses clean and the scour water is only mildly dirty.
Your fabric is now ready to be Mordanted & Dyed!
Scouring PFD Cotton Fabric
Once again it is time to point out the importance of proper fabric preparation when dyeing with natural dyes. I don't say this to be rude but rather to save you much time and effort when dyeing cotton with natural dyes.
Q. Do I have to scour my PFD, Prepared for Dyeing, Fabrics?
A. YES you must scour PFD fabric before mordnating and dyeing with natural dyes, I go as far as even washing BEFORE I scour my fabric to ensure that the dressing oils, all fabrics receive these it's to keep the dust down when the fabric is rolled onto bolts, tubes, etc.. I have scouring instructions on my website and video on youtube. The scouring process is so very important with cellulosic fibers as it helps to force the fibers open before the mordanting and dyeing steps. Scouring ensures that your fabric will hold maximum natural dye molecules and helps to achieve truer colors.
Q. is your water hard or treated? Water quality is very important regarding the final dye color out come. Hard water tends to supress most dye molecules (exception is weld it becomes more intense).
Q. Which plants do you plan to dye with? Some plants do not yield permanent color so it is important to know this before you start a project, as depending on your plans for the fabric you may not be able to over dye at a later date if your colors fade.
NOTE: Also cotton fabrics don't take certain natural dye colors no matter what you do to the fabric but silk and wool fabrics will suck the color up like no tomorrow.
Why Should I Scour PFD Cotton Fabric
Once again it is time to point out the importance of proper fabric preparation when dyeing with natural dyes. I don't say this to be rude but rather to save you much time, effort, and disappointment when dyeing cotton with natural dyes.
Q. Do I have to scour my PFD, Prepared for Dyeing, Fabrics?
A. YES you must scour PFD fabric before mordnating and dyeing with natural dyes, I go as far as even washing BEFORE I scour my fabric to ensure that the dressing oils, all fabrics receive these it's to keep the dust down when the fabric is rolled onto bolts, tubes, etc.. I have scouring instructions on my website and video on youtube. The scouring process is so very important with cellulosic fibers as it helps to force the fibers open before the mordanting and dyeing steps. Scouring ensures that your fabric will hold maximum natural dye molecules and helps to achieve truer colors.
Q. is your water hard or treated? Water quality is very important regarding the final dye color out come. Hard water tends to supress most dye molecules (exception is weld it becomes more intense).
Q. Which plants do you plan to dye with? Some plants do not yield permanent color so it is important to know this before you start a project, as depending on your plans for the fabric you may not be able to over dye at a later date if your colors fade.
NOTE: Also cotton fabrics don't take certain natural dye colors no matter what you do to the fabric but silk and wool fabrics will suck the color up like no tomorrow.
Scouring PFD Fabrics
Once again it is time to point out the importance of proper fabric preparation when dyeing with natural dyes. I don't say this to be rude but rather to save you much time and effort when dyeing cotton with natural dyes.
Q. Do I have to scour my PFD, Prepared for Dyeing, Fabrics?
A. YES you must scour PFD fabric before mordnating and dyeing with natural dyes, I go as far as even washing BEFORE I scour my fabric to ensure that the dressing oils, all fabrics receive these it's to keep the dust down when the fabric is rolled onto bolts, tubes, etc.. I have scouring instructions on my website and video on youtube. The scouring process is so very important with cellulosic fibers as it helps to force the fibers open before the mordanting and dyeing steps. Scouring ensures that your fabric will hold maximum natural dye molecules and helps to achieve truer colors.
Q. is your water hard or treated? Water quality is very important regarding the final dye color out come. Hard water tends to supress most dye molecules (exception is weld it becomes more intense).
Q. Which plants do you plan to dye with? Some plants do not yield permanent color so it is important to know this before you start a project, as depending on your plans for the fabric you may not be able to over dye at a later date if your colors fade.
NOTE: Also cotton fabrics don't take certain natural dye colors no matter what you do to the fabric but silk and wool fabrics will suck the color up like no tomorrow.
Q. Do I have to scour my PFD, Prepared for Dyeing, Fabrics?
A. YES you must scour PFD fabric before mordnating and dyeing with natural dyes, I go as far as even washing BEFORE I scour my fabric to ensure that the dressing oils, all fabrics receive these it's to keep the dust down when the fabric is rolled onto bolts, tubes, etc.. I have scouring instructions on my website and video on youtube. The scouring process is so very important with cellulosic fibers as it helps to force the fibers open before the mordanting and dyeing steps. Scouring ensures that your fabric will hold maximum natural dye molecules and helps to achieve truer colors.
Q. is your water hard or treated? Water quality is very important regarding the final dye color out come. Hard water tends to supress most dye molecules (exception is weld it becomes more intense).
Q. Which plants do you plan to dye with? Some plants do not yield permanent color so it is important to know this before you start a project, as depending on your plans for the fabric you may not be able to over dye at a later date if your colors fade.
NOTE: Also cotton fabrics don't take certain natural dye colors no matter what you do to the fabric but silk and wool fabrics will suck the color up like no tomorrow.
Rust Dyed Fabric
Time and time again I'm called out publically on why I advocate using baking soda to neutralize my rust dyed fabrics! Here's my "edited response"
... rinse in baking soda solution once a year [Edited] Synthropol does NOTHING to stop the rusting process! If you'd like to slow it down and I can certainly understand wanting to do so then neutralize it once a year with a baking soda solution! That is why I recommend this step is because you are neutralizing the acids on the fabrics surface.
In conservation if we want to stop or remove "foxing" which most would see as either a rust spot or something akin to a scorch mark then we neutralize the piece or area with a baking soda solution. First the piece is washed in a pH neutral soap and if that doesn't remove the spot and removal is necessary then we use baking soda solution. Foxing is typically caused by linens etc., that come into contact with high acid woods such as cedar, pine, oak, etc., when they are stored in hope chests, dresser drawers, etc.
Some of us, that would be me, are eagerly anticipating the deconstruction of our pieces due to the rusting and composting processes.
If your piece is not too heavily rusted then and you want it on your bed then I say go for it! Just remember that anything it comes into contact with may also start to rust over time.
Yes your rusted piece will continue to rust, and eventually holes may appear in the fabric. NOTE that this all depends on where you live as in how high your relative humidity is etc. Rusted fabric in say Louisana will have a much shorter life, due to the high humidity, than say rusted fabric that lives in Utah or Arizona where the humidity is around 20-30% year round.
You can slow down the rusting process, though you will never stop the process entirely, by neutralizing the fabric with a baking soda solution. You can apply the solution once or twice a year depending on where you live. Those of you living in the desert may never have to do this step.
I recommend 1 tablespoon of baking soda to 1 gallon warm water. Dissolve well and apply by either spritzing the fabric with the solution using a spray bottle or by direct immersion of the piece.